Mason Jar Spice Drawer Organization w/ Chalkboard Labels

**This post contains affiliate links.


Howdy! I just completed a simple organization project that made a huge difference in my kitchen, so I thought I’d share it with you. I completely overhauled my spice organization and drawers! And it was easy and fun.

Here’s a little back story: we moved into a new house in January. We were blessed to build a new prefab home on acreage, and we are loving the country life again. (I will try to post more house pics as we get into the groove and settle in. We are on the verge of listing our old house, so as you can imagine, we haven’t completed many projects in the new place yet!) Our build was a budget build, so we spent money on all the important structural items and things that would be difficult to change later – roofing, insulation, 9′ ceiling heights, windows, walkout basement, etc. – and didn’t upgrade any finishes. So our house is a beautifully blank page waiting to be written on. The rooms are clean, open, and ready to be decorated and/or finished.

That includes the kitchen. We got the basic cabinets and countertops, bought our own appliances, and plan to customize over time. What we didn’t realize is that these cabinets came with extremely shallow drawers – out of 22 drawers, only ONE is more than 2.5″ deep! That’s 21 very shallow drawers to work with. Examples of items that no longer fit in drawers: ladles, cooking spatulas, most serving utensils, stacks of dish towels more than 2 high, and spice jars! It might seem trivial, but the drawers have become a waste of space and a big source of frustration. A lovely, huge kitchen with so much wasted space is a kitchen begging for some tweaking! I discovered that I could lie all the jars flat and they would fit, but since I accumulated them over time, they were many sizes and shapes. Putting them in any sort of order was impossible. And the round ones rolled! I had labeled all of my jars on the lids, so the jars were no longer labeled properly. (This isn’t a problem for me as much as for my children – my older children like to cook and bake, and they aren’t always able to identify herbs and spices by sight, as I am.)

Messy spice drawer, BEFORE
The sad, jumbled before. Not even recycled baby food jars would fit standing up!

So I did a little thinking, measuring, and planning. I discovered that 4 oz. mason jars fit perfectly in my drawers, and they were very affordable. (That link is to Amazon, but if you have an Ace Hardware nearby, I recommend buying them there via free store pickup. It’s the cheapest option for any size of mason jar. I’m not affiliated with Ace; just a happy customer.)

Chalkboard Con-Tact paper. I have lots left and so many ideas!

Once my jars arrived, I measured the lids and decided to buy a cheap roll of chalkboard contact paper and punch out perfect circles for the lids. (FYI: 2″ circles fit perfectly on regular size mason jar lids.) I wanted the look of chalkboard labels, but I didn’t want the labels to rub off easily, so I decided to buy oil-based Sharpie paint pens to make the label permanent. (This project only uses a very small amount of the chalkboard paper, so I have lots left to make new labels, if needed. If you want to make your labels erasable but semi-permanent, you could try wet erase chalk markers, like these. I didn’t want my messy little sous chefs to accidentally wipe things off with their greasy fingers, so I decided not to go that route. They may be more durable than I suspect, though! If you try them, do comment and let me know.)

And here’s the after!


Mason Jar Spice Jar DIY

SUPPLIES NEEDED


INSTRUCTIONS

  1. Wash all jars and lids. I ran the jars through the dishwasher but hand washed the lids. Allow to dry completely.
  2. Punch out as many chalkboard labels as you will need for your spice drawer/cabinet. I needed 36. TIP: flip the punch over to the clear side to help you line up the punch with as little waste possible.
  3. Prime & shake your marker, and do a few practice labels. Your handwriting will be very visible, so make sure it looks the way you like.
  4. Label your lids, transfer herbs/spices to new jars, and organize in your drawer or on your shelf! I had kid helpers, so we worked a few jars at a time so as not to lose track of what was actually in each jar. I was delighted that my kids chose to alphabetize the spices, as that’s what I would’ve done if they hadn’t.

The Ultimate Large Family Diaper Bag

**Spoiler alert: it’s the Turbo Transit Pack by L.L. Bean. I am in no way affiliated with the company; I bought this backpack with my own money and am a very satisfied customer. 


I have found the perfect family/diaper bag for our large family.

I have seven children, two of whom are still in diapers, and a third who needs me to carry around a backup outfit. I have tried many, many diaper bags, and I have finally concluded that this bag is the best fit for our large family.

In this case, form wins over function – it’s not ugly, per se, but it’s not going to win any fashion awards. It’s a sturdy black backpack. You’re probably not going to pin this post. But you know what? It works. It carries everything I need it to carry, and because it’s organized so well with so many compartments, I can always find what I’m looking for. It’s easy to carry, gender neutral, and can be re-purposed when I no longer need such a large bag.

But why this particular backpack? There are certainly cheaper options out there. I know; I’ve tried them. But THIS one – it’s special. It’s the Turbo Transit Backpack by L.L. Bean, and at 2,592 cubic inches, it’s the largest backpack they make. Your college student could live out of this thing. What makes it unique is that is has a bottom shoe compartment (which I don’t actually use for shoes; see below for more info) that removes some of the depth from the main upper pockets. They are still deep enough for textbooks, but you no longer loose everything in a giant, cavernous compartment. Deep bags are great for carrying stuff, but not great for finding that stuff again. The shoe compartment has really eliminated that problem and makes better use of the existing space. It also has three main large compartments up top, plus three more smaller pockets, so I’m able to separate the content by person/function.

Giant diaper bags with tiny pockets along the sides don’t help me at all – I have two in diapers, and what if we need to change two at once? Keeping wipes and/or diapers in a nice little elastic pocket along the inside is fine for smaller diaper bags intended for only one child. But I’ve never found those elastic pockets to function well for me. I have separate bags inside that house a set of wipes, changing pad, diapers, and spare clothes for each child. My husband can grab one kid and I grab the other, and we don’t have to take turns with the diaper bag. I can’t tell you how many times this has come in handy. I know that when I grab that child’s changing bag, everything I need is in there. Also, did you catch the “seven children” part? Seven kids, no matter their ages, tend to need a lot of stuff. I’m able to organize things for all of them in my backpack, with room to spare for a couple of water bottles and other temporary oddities. I can even stash coats and sweatshirts by hanging them from the bungee outside.

Why L.L. Bean, then? There are other bags with shoe compartments. I do realize this. But I’ve not found one this big, nor this organized. And to top it all off, L.L. Bean has a 100% Satisfaction Guarantee – and it doesn’t have a time limit.  When my original Turbo Transit Pack (2012) developed a couple of small issues (top handle strap started detaching, and the reflective piping was worn off quite badly), they paid for me to ship it back to them. Four years later. But the really awesome part? My backpack never showed up at their returns facility. And they sent me a new one anyway! How’s that for customer service?

I lived for over a month without my Turbo Transit Pack. I used another large tote that I really like and normally use for overnights and weekend trips. And while it held everything, I found myself really missing my old backpack. I couldn’t find things easily. I’d yank on one changing bag and the entire contests of the tote would come flying out at me – because it was all packed too tightly in one large compartment. Up until this unintentional month-long experiment, I was rather ambivalent about our Turbo Transit Pack. It was so functional that I never had to think about it, but I was always on the lookout for something…cuter. And then discovered that using my cute tote bag, even with interior & exterior pockets, wasn’t as good.

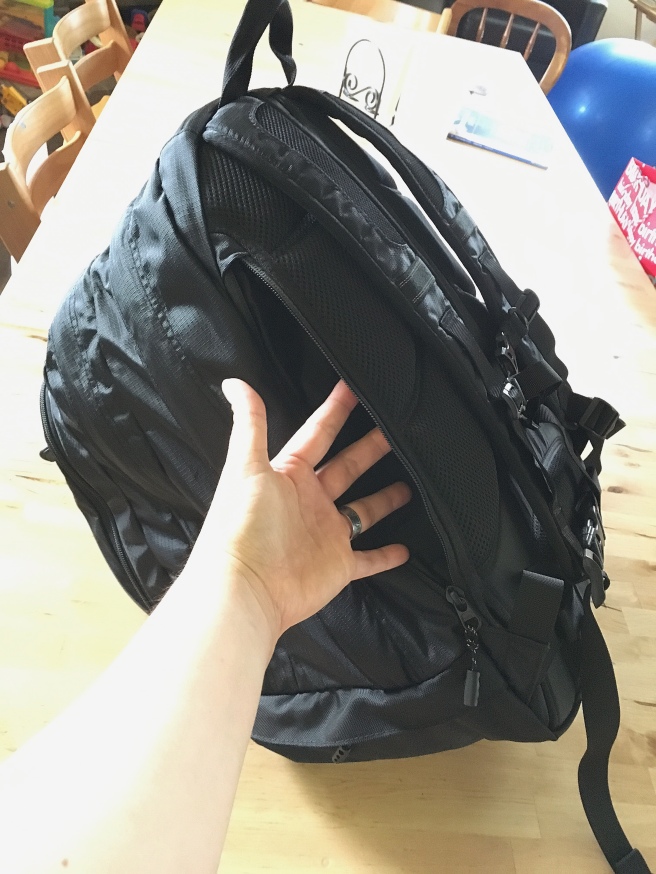
Here she is: the World’s Best Large Family Bag, my L.L. Bean Turbo Transit Pack. Those bungee cords are great for stashing the shirt your toddler suddenly won’t wear, or the jacket your kid swears is smothering him with its heat and he can’t carry it because he’s so tired but can he go play?
Main compartment: one bag each for infant Sayer (green) and toddler Lyra (pink). I bought these from a company that is no longer in business (sniff; they were super affordable), but the are a lot like this wet bag (link): they have a loop strap and two zippered pockets. I can stash diapers, wipes, and a changing pad in the large compartment and clean clothes in the smaller one. If there is an accident or we’re using cloth, everything gets shifted to one pocket so the other can contain the dirty things. (Also located in this main compartment is a padded laptop pocket.)
Next compartment: a third waterproof bag for preschooler Silas. This is the same size wet bag as the other two, but it only contains spare clothes. Thus this emptier backpack compartment is where I also throw extra water bottles/sippy cups or other miscellaneous items.
Front zipper pocket: this one has a few organizing pockets in it, for holding pens and other small things. I still have my own separate zipper bags for organizing stuff: the colorful bag you see contains girl stuff that might need to be transported to the bathroom, while the clear zipper bag has things like wipes for faces, medicines, sanitizing spray, tissues, etc.  I also carry a small brush, a bib, three matchbox cars, a small set of wooden blocks, a New Testament, and a ring of daily prayer cards. Not bad for such a small pocket!
Device pocket: this handy little guy floats up high and has a hole for a headphone/earpiece cord. I have never used it for that, but I do stash my phone/money/keys in here if I’m wanting to leave my purse at home.
Front-front zipper pocket: this is another smaller, flatter pocket that sits in front near the bungees. Great for the husband’s wallet/keys, random kid stuff (“Can you carry this very special sticker and never lose it?”), and even one sippy cup will fit in there.
The Awesome Shoe Compartment: you could totally fit a pair of large adult shoes in here, if you were using this as your school/gym bag. But I use this big bonus pocket for a pullover raincoat, a travel sun hat, a nursing poncho, and a ring sling. That’s a lot of stuff!
file_000
Back Pocket: I just found a new pocket! My older version didn’t have this. It’s a flat, tall pocket in the back. You could fit notebooks or larger books (that aren’t too thick) in here, as well as a smaller laptop. 

The Marathon Birth of Sayer Augustus

(Started Friday 7/29/16)

He’s here! Our sweet, cherished, much-loved, and hard-earned son Sayer Augustus arrived on Wednesday, July 27, 2016 at 6:03 a.m after over 30 hours of labor. He weighed 7 lbs., 13.2 oz., was 20.5″ long, and has a head full of brown hair. (So much hair!) We think his eyes are blue, but it’s really hard to tell yet. He looks a whole lot like his brother Silas did at birth, which is a first for us – his six older siblings all look very different from one another. It’s fun to compare Silas & Sayer’s pictures and see how much they look alike. Sayer’s hair is darker and fuller, and his eyes are lighter – but otherwise, they are carbon copies so far!

He is currently two days old and doing very well. My mother-in-law has been taking care of my family since Tuesday evening and has been an enormous blessing (as she always is). She is leaving tomorrow (sniff). My older daughters have also been indispensable and more helpful than I ever imagined. They are wonderful kids! This morning was hard, as Sayer was just plain hungry. So he cried and cried and refused to latch after a while. But by this afternoon, I finally coaxed him to nurse again, and he realized the good stuff is coming. And how he’s sleeping and eating peacefully again. I am loving and soaking up these first precious days with him – oh, how quickly it’s over. He will be enormous before I can blink, and life will be a blur of family and homeschooling and homekeeping, and I will long for these days. So I’m trying my best to sit back and just stare at him as I recover from his marathon birth.

I am still processing many details of his birth. I think I’m going to try to give a basic overview, and perhaps I will add to it as time goes on. Some details are very difficult/personal and may never be shared here, but if you are a loved one, feel free to engage me in conversation. I love each one of my birth stories and am an advocate for informed birth, and as such, I enjoy talking with people about it. I have had two hospital births, one freestanding birth center birth, and four homebirths, and each has taught me something. Writing them down helps me sort, file, & remember. But this birth was very hard, and I don’t think I’m even ready to write some things down yet.

Last Wednesday, at 38 weeks even, I was barely 2 cm dilated, 70% effaced, and cervix posterior. This was discouraging news for me, as I am always more progressed at 38 weeks. Like many grand multiparas, I had been having prodromal labor, regular & irregular contractions, etc. for a couple of weeks. Usually, this progresses me far enough that when labor actually decides to go full force, it’s not too long before the baby’s here. This time, I was concerned that labor would be either a long way off, or a very long one, as it seemed like my body was working but things weren’t progressing. My instincts were correct.

Labor began Monday night (38 weeks, 5 days). I started having regular contractions that felt like early labor in the evening, and when I went to bed, I would barely drift off to sleep before a contraction would wake me up. By 2 a.m., I realized I wasn’t going to get any sleep, so I started tracking labor on my phone. Contractions were regular and timeable (10-12 min apart, 60-90 sec long) and lasted all night. I woke my husband up at some point (I think around 4 a.m. Tuesday morning?) and told him what was going on. I was starting to deal with some serious anxiety about this labor – it wasn’t picking up and I couldn’t sleep. I was afraid that once things finally got serious, I’d have no energy left to push. Sleep deprivation makes things so much harder. Anxiety feeds the fear-pain-tension cycle. As someone who has had five beautiful, unmedicated, out-of-hospital births, I knew that this anxiety was not normal for me and was very much working against me. I talked with our midwife, Hannah, and she was very encouraging and had some great advice. I told her we’d let her know when we needed her, but I knew things were going very slowly and it would be a while.

We tried several things throughout the day Tuesday (38 weeks, 6 days). Labor paused a couple of times for an hour or so, but always picked back up. I tried lavender epsom salt baths, a glass of wine, napping, etc – but the labor persisted. I wanted labor to pause so I could rest and finish with the energy and strength I knew I’d need, but it was not to be. Eventually, the contractions got closer together. By midnight Tuesday (which I guess is actually Wednesday?) they were 5-7 min apart and feeling slightly stronger. I had been in labor over 24 hours and was looking at a second night without any sleep – and I was completely spent. I tried very hard to get some sleep, but labor just kept on coming. Persistent, hard work, but not getting stronger. I was completely and utterly exhausted. My body and mind were spent, and my spirit was having trouble dragging them along.

In the wee hours of Wednesday morning, we decided to go to the hospital for an epidural. I knew that I needed labor to either pick up and finish or stop – I needed rest. There was no way I was going to be able to push out the baby after essentially being awake since Monday morning. I knew that an epidural would give me a chance to rest. I hoped that labor would then progress, as well. We prayed and talked for many hours and had complete peace over this decision. Hannah was very supportive of whatever we decided.

On a clear, beautiful, starry morning, we were admitted to labor & delivery. I was now 39 weeks even. After over 24 hours of labor, I was still only 4-5 cm, 90% effaced, and cervix still somewhat posterior! (This from the woman who has had two labors start-to-finish in 1.5 hrs or less!) Baby’s head was high. I just needed to rest. I had an epidural at 3 a.m., and rested until I was ready to push.

I felt the urge to push after a couple of hours. I didn’t know how pushing would go with an epidural – the last one I had was 13 years ago, and it was my first birth. A lifetime ago. Turns out, whether because of the epidural or because of his position or because I was totally exhausted, pushing was much harder this time. I worked really hard.  It was still only 10 minutes, but my last five babies were pushed out in 5 minutes or less. I started on hands and knees, but it wasn’t working for me, so I asked for the squatting bar. Even with the epidural, I was able to use the bar with the end of the bed dropped and push in a squat (with nurses helping me get there!). Sayer was born at 6:03 a.m. – after 30 hours of labor over three days – with a lump on his head from bad presentation –  AND a nuchal hand (hand by his face). No wonder it took so long. No wonder things never progressed. His head was poorly positioned and labor was working against me until the very end.

The nurses and staff at the hospital were largely wonderful, helpful, and encouraging. Many were fascinated by my birth history and asked me lots of questions. I was treated well, with respect, and the post-birth care was exactly how I wanted it – the baby was not taken from me without my consent, ever. The cord was left alone until it was done pulsing. We had an hour of skin-to-skin before a nurse came to weight & measure him – and she didn’t do any of the things I declined (no bath, no shots or eye ointment). We were able to leave after 24 hours to come home to our family.

There are things that were hard, and things that I regret. I was so completely exhausted that I was not able to be my own best advocate, and in dealing with the hospital midwife I was given, I consented to choices I regret. Overall, the choice to go to the hospital was one I would make again in a heartbeat. But I would make sure to have a clear-headed, well-rested advocate with me! If I ever were to plan a hospital birth, I would make sure to have a doula. Obviously, this hospital birth was not planned, so things went differently. In the end, Sayer is healthy, and I was able to push him out, and those things are priceless to me.

I think this is the type of birth that will take months, if not years, to truly process. I keep remembering things – facts, emotions, hazy memories – and piecing it all together. I second guess decisions we made, mourn the homebirth I didn’t get to have, and deal with huge feelings that I didn’t know were there. Simultaneously, I’m filled with gratefulness, joy at a healthy baby, confirmation and peace at most decisions we made. Throw in post partum hormones and I’m bit of a gigantic roller coaster mess right now. And that’s okay. I have a great family – truly the best husband & children a woman could ever want – and my sweet baby is like a healing balm all by himself.

38 Weeks Pregnant with Baby Number 7


Well, look who’s blogging!

I dug into my archives today, looking for exact birth stats for some of my kids (I knew my blog wouldn’t let me down!), and I was so delighted to read the detailed entries I posted up until their births. In the years before Facebook became a common way to connect, people followed me via my blog. I reached out via my blog. I recorded a lot more! It was my journal.

I miss that. I can’t promise I’ll blog daily again, but I would like to try to record some thoughts today, as I look forward to the birth of our seventh baby.


This pregnancy has both flown by and dragged on. Such is the case when you already have six children to care for. Physically, I am very ready for this little guy to be born. My body is tired, I’m not sleeping well, etc. I’ve had a lot more heartburn this time than with most others (except Ellery), so I half expect a redhead. (After her pregnancy, I read a study that correlated heartburn in pregnancy with redheaded babies! Really!) I’m ready to get my body back and exercise comfortably and have energy again. My core was in pretty poor shape prior to this (somewhat surprise) pregnancy, and now it’s just plain shot. I have diastasis recti and an umbilical hernia. I’m honored and blessed to have been able to grow one nearly-term and six full-term babies in this body; it’s truly an amazing miracle that I do not take lightly. But the result of that is a tired core that could have used some care and repair between babies. I’m guilty; I didn’t do enough. I’m looking forward to a restful post partum/babymoon period and then gently working my core back into shape. Whether or not God blesses us with more babies, this body needs to be strong to keep up with the seven I’ve already got!

Emotionally, I’m also ready to hold my son. I can’t wait to see what he looks like. We have such a genetic diversity in our family that the most fun part of seeing our newest child is discovering his features! The three sons we already have couldn’t be more varied physically if they tried: from almost-black brunette to bleach blond to light brown hair; from almost-black to bright blue to hazel-green eyes – those boys are a rainbow. I love it. I love them. It makes it likely, then that this 4th son will resemble one or more of this brothers. There aren’t a lot of choices left! If he has red hair and bright green eyes, we will truly have covered it all. I know the first couple of weeks just fly by – oh, how I know! – and I want to rush to get there and THEN hit the pause button and just savor this new guy. My babies grow so very fast that I have to sit and just stare at them every day those first weeks to truly take it all in.

Logistically, I’m not really ready. I have more organizing and cleaning to do in our master bedroom. We had some basement plumbing and water issues last month, and we are still putting things back together from that (both financially and furniture-wise!) and the house hasn’t felt fully clean since everything blew up. There are dozens of small home projects that both Jason and I would love to complete before the baby comes. But really, we know it’s not going to happen. We just want to feel more clean & organized and then enjoy our new boy.


The kids are so excited. Well, except Lyra. She just turned two Sunday (!!) and has NO IDEA how much her life is going to change. She’s very much the baby, and doesn’t even like it when I hold one of her brothers on my lap to read, so having a baby that doesn’t leave is going to shock her a bit. She does like to see babies, though, so I have hope that she will surprise me with her adjustment. She is the youngest to become an older sibling in our family (the other kids are all 2 yrs. 2 mos. – 2 yrs. 8 mos apart) so developmentally, I don’t think she grasps anything yet. The older kids are anxious to hold him, know his name, and even witness his labor. Maya (13) has witnessed three of her siblings’ births and wants to be present for this one. Ellery (11) wants to be around but isn’t sure she wants to be present for the actual birth. Asher (8) claims he wants to watch, but I’m not sure he knows enough about birth yet to make that decision. I made the girls watch birth videos before they decided in prior births, so perhaps that’s the way to go with him. I’d better get on that.

The younger kids will likely hang out at a friend’s house if it’s daytime. I kinda hope it’s nighttime so they can just sleep and wake up to a new baby, easy peasy (for them!). Lyra is extremely shy, so I don’t think she’ll do well at another home, and thus she’ll stay home with Ellery caring for her. At least that’s the plan.


In terms of progress: last week at 37 weeks, 1 day, I was 1.5 cm diated, 40% effaced, -1 station. I was surprised by how closed I was! And I was surprised again today, at 38 weeks even, to find that I’m only 2 cm, 70% effaced, and cervix quite posterior. I’ve never been less than a stretchy 3 cm at 38 weeks, that I can recall. (Gotta go back and read more blog archives, I guess!). And remember, I was 5 cm+, 75% effaced, and waters bulging at this stage with Asher! I’ve been crampy and having irregular contractions/prodromal labor for the past two weeks, so I expected more. I’m always more open and effaced at this point. I know, intellectually, that numbers don’t mean much and I could still give birth any time now, but I also have my prior six pregnancies to compare to. I am just always more physically ready at this point. Puzzling, isn’t it? I know myself well enough to know that all of my emotions are normal (I’m never going to have this baby, I’ll be pregnant forever, I can’t wait another 1-2 weeks, What if this means my labor will be longer/harder?). I’ve done this before. But it doesn’t negate that fact that the emotions/thoughts are really there, and I have to deal with them.


So now: my job is to be at peace. Be content with every single day this baby is cozy and healthy and safe inside me. Pray for his well being, for his safe arrival, and try to be present for my family as I await the birth (whenever it comes!). Besides my first, who was born at 35 weeks, 5 days, the earliest I’ve had a baby is 38 weeks, 5 days. That would be this coming Monday. And the, ahem, data seems to suggest we may have a bit longer to wait. Whatever, I can handle this. I’m going to spend tomorrow nesting a bit, spending extra quality time with my current baby, play games and read lots of books, tell my older kids how much I appreciate their help, remind my husband how much I love him…and I’m going to try very hard not to think about how I’m not in labor.

Someone New

We are very happy to share that we are expecting our 7th baby to arrive sometime in late July/early August – and we just found out it’s a BOY!!

Baby 7 Mar-16 3

I am 19 weeks and enjoying the middle of this pregnancy – no longer sick (it was BAD this time) and not horribly enormous yet. My core and ab muscles are pretty shot from all of those babies, so I’m wearing my belly support a little earlier this time. I am prone to headaches, but our amazing and miraculous chiropractor fixes that whenever they recur, so I’m feel pretty optimistic about that. Other than that, I feel great, and I’m enjoying some regular exercise.

We are planning our 5th homebirth (we have also had one hospital birth and one freestanding birth center birth) – and for the first time, we are using a different midwife. Not by choice, but rather by necessity; our beloved Linda will be on vacation (how dare she?!) the week I am due! So we are going with the daughter of the other midwife that worked with Linda during Ellery’s pregnancy (both of whom missed her birth entirely). We like Hannah very much and look forward to working with her.

THM Easy Sprouted Whole Grain Bread (in a Bread Machine!)


This recipe makes two loaves of delicious, Trim Healthy Mama-friendly sprouted bread – without kneading or spending more than a couple of minutes tending to it. You simply need to be around to manage the process. You will be letting the machine do the mixing and kneading, and then you will let your oven do the baking. The original recipe can be found here – and you really should go visit that post and look and her step-by-step pictures. They are beautiful and helpful.

After making it according to the original recipe once, I simply adapted the ingredient amounts and mixing order to improve flavor and rising. Below is my version. (I have not yet adapted the volume measurements to weight, as is my preferred practice for baking, but I am working on it.)

INGREDIENTS

  • 2 cups water
  • 1 tbsp honey
  • 1.5 tsp yeast
  • 4 2/3 c organic sprouted whole grain flour (I like 3 cups sprouted spelt + 1 2/3 cups sprouted wheat)
  • 2 tsp salt
  • 2 tbsp butter

DIRECTIONS

  1. Put water, honey, and yeast into a 2 lb. capacity bread machine pan. For best results, use barely warm (not hot!) water to help soften the yeast and encourage rising.
  2. Measure flour and salt and add to the pan. Cut your butter into 8 small cubes and distribute them evenly over the top of the flour.
  3. Set the machine to the dough cycle and let it do its work. In the first few minutes, you will want to check the mixture and scrape down the sides of the pan with a rubber spatula, if needed. Add a bit of water if the dough is not very moist – it should be a slightly sticky dough, but still able to form a ball.
  4. When the dough cycle is complete, dump the dough out onto an oiled/buttered counter and press out all the air with your oiled hands. Divide the dough into two equal-sized lumps, form them into a tight ball, then a loaf shape. Put them in loaf pans and let them rise in a warm, draft-free place for 30 minutes (or until roughly doubled in size; this will take longer in cooler climates).
  5. Bake in a pre-heated oven at 350 for 30 min. Remove the bread from the pans and set to cool on a cooling rack, lightly buttering the tops to soften the crust (optional).

NOTES

  • Basically, if you put all ingredients in your bread machine in the order listed above, run the dough cycle, divide into two loaves, rise for 30, bake for 30, and set to cool – you will probably turn out with great bread. I add some helpful commentary for those who have not baked before, but I promise it’s much easier than my wordiness indicates.
  • If you’re going to set the timer on your bread machine and knead it later, you’ll want to place the yeast on top of the flour instead of in the water. The water and honey hydrates and activates the yeast faster for better rising, which is not what you want if you are, say, setting the timer for the dough to be ready when you get home from work. In this case, make sure the yeast is not touching the water or salt.
  • I like One Degree organic sprouted flours, both spelt and whole wheat. Try to find them locally (at a health food store or Whole Foods), but you can order online (I had to). Find the sprouted spelt here and the sprouted whole wheat here.
  • To make rolls, instead of dividing the dough into two loaves, divide it into your desired roll size. I make 24. Allow the rolls to rise in a buttered 9×13 for 20 min, then bake for 20. They are done when lightly browned on top.

Slow Cooker Mexican-Style Chicken (for a Crowd)

There are probably hundreds of similar recipes to be found on the great big interwebz, but I tweaked this to suit a larger crowd. I use my 6 quart crockpot and serve with a nice, big pot of rice and tortilla chips alongside.

INGREDIENTS

  • 5 lbs. boneless, skinless chicken (breast or thigh)
  • 3 16 oz. jars salsa
  • 3 cans black beans, drained & rinsed
  • 3 cups frozen corn
  • 2-3 8 oz. blocks cream cheese

DIRECTIONS

  1. Place first four ingredients in slow cooker. Cook on low for 8-10 hours or high for 4-6.
  2. 30 min. before serving, shred chicken with two forks. Place whole blocks of cream cheese on top. It will melt in nicely by itself.

  3. Give it a good stir to incorporate the cream cheese fully and serve over rice or with tortilla chips. I like to include a bottle of hot sauce for the more adventurous.

1975 Split-Entry Farmhouse: Before and After

We moved into this house in August 2008 with three kids and moved out in July 2014 – three days (!!!) before our sixth child was born. It had all but completely fallen apart on us over those six years, so we have poured our hearts, minds, energy, and money into this place. We love how it turned out, and can’t wait to see how the new owners take it to the next level! (It’s currently on the market; if you’re looking for a beautifully renovated 3 bedroom, 2 bath home on 10.2 acres in southwest Michigan, I’ve got a place for you! But act quickly, because activity has been hot on this place.)

These are all real estate listing pictures – befores from the previous owners, afters from the current listing. Just pics today; details in future posts.

EXTERIOR

Exterior Before
Exterior Before
Exterior After
Exterior After
Exterior After
Exterior After
Exterior After
Exterior After
Exterior After
Exterior After

KITCHEN

Kitchen Before
Kitchen Before
Kitchen After
Kitchen After
Kitchen After
Kitchen After
Kitchen After
Kitchen After

GREAT ROOM

Great Room Before
Great Room Before
Great Room Before
Great Room Before
Great Room After
Great Room After
Great Room After
Great Room After
Great Room After
Great Room After
Great Room After
Great Room After

DINING ROOM/DEN

Dining Room/Den Before
Dining Room/Den After

ENTRY

Entry Before
Entry Before
Entry After
Entry After

MAIN BATHROOM

Main Bathroom Before
Main Bathroom After
Main Bathroom After

LOWER LEVEL BATHROOM

Lower Level Bathroom Before
Lower Level Bathroom After

FAMILY ROOM

Family Room Before
Family Room Before
Family Room After
Family Room After
Family Room After
Family Room After

BEDROOMS

Master Bedroom Before
Master Bedroom After
Bedroom 2 Before
Bedroom 2 Before
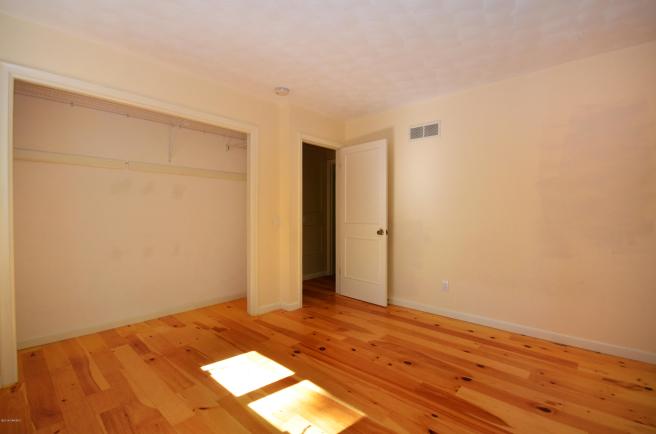
Bedroom 2 After
Bedroom 2 After
Bedroom 2 After
Bedroom 2 After
Bedroom 3 Before
Bedroom 3 Before
Bedroom 3 After
Bedroom 3 After
Bedroom 3 After
Bedroom 3 After

LAUNDRY/UTILITY ROOM (no before)

Laundry/Utility Room After

DECK

Deck Before
Deck Before
Deck After
Deck After
Deck After
Deck After

PASTURE/PROPERTY

Pole Barn Before
Pole Barn Before
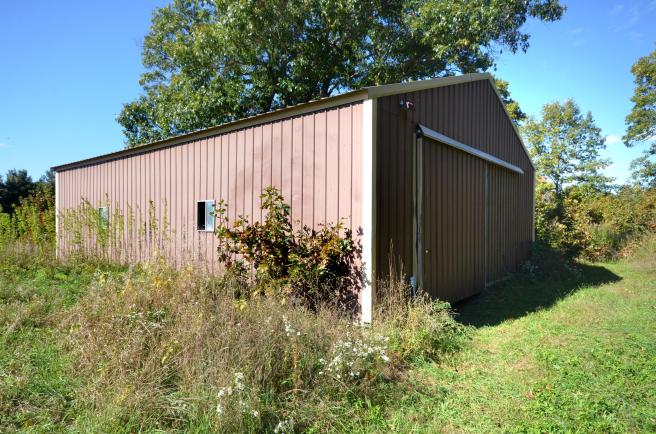
Pole Barn After
Pole Barn After
Pasture Before
Pasture Before
Pasture Before
Pasture Before
Pasture Before
Pasture Before
Pasture After
Pasture After
Pasture After
Pasture After
Pasture After
Pasture After

DRIVEWAY/WOODS/FRONT YARD (no after)

Driveway/Woods Before
Driveway/Woods/Front Yard Before

First Day of School 2014

We had our first day of (home)school on September 2, 2014. After a two week break due to the pukeys (so fun with such a big family!!) and getting our “old” house on the market, we’re back at it. I will try to update with a homeschool curriculum post soon, but for now, here’s a pic of my students for this year – our first year on the front steps of our new house. Sniff. Bittersweet!

From L-R: Silas (2), Ellery (9 - 4th grade), Callan (4 - preK), Maya (11 - 6th grade), Lyra (six weeks!), Asher (6 - 1st grade)
From L-R: Silas (2), Ellery (9 – 4th grade), Callan (4 – preK), Maya (11 – 6th grade), Lyra (six weeks!), Asher (6 – 1st grade)